You learnt how to setup domain name server in last guide. Now you will be setting Apache Virtual server for your domain. This will enable the domain to answer to internet requests and direct to your web files. In short without a virtual server you can’t reach to a website. This guide can be used for any VPS and Amazon instances.
As usual, I am assuming somethings;
1. You have installed Apache, PHP etc.
2. You have Webmin installed and setup your name servers in BIND.
3. Your domain is pointed to your nameservers at your registrar.
Setting Apache Virtual Webserver for your domain:
1. Login to Webmin using your IP address and port number. Usually this is something like this;
http://IPAdd:10000
For Amazon service users, Elastic IP will be used at IP place. Also, remember to use ‘https’ if you have installed Amazon Generic Linux Image.
2. After login, go to ‘Others’ –> ‘File Manager’ from the sidebar. Click Ok or Accept for any warnings.
3. Navigate yourself by double clicking the directories to ‘html’ or ‘public_html’ folder. This will depend on the type of OS and version you have. Usually, this is the path;
/var/www/html
4. Now, click ‘New Folder’ icon from top row. Name this new folder whatever your domain name is. E.g.;
/var/www/html/yourdomain.com
NOTE: This also can be done using command line access using PuTTY. For that you have to pass only one line at prompt. Make sure you have root access or at least use ‘Sudo’ in front of command if you get error.
mkdir /var/www/html/yourdomain.com
5. Now, go back to Sidebar and navigate to ‘Apache Webserver’ present under ‘Servers’ option.
6. Make sure Apache is running by looking at top-corner location.
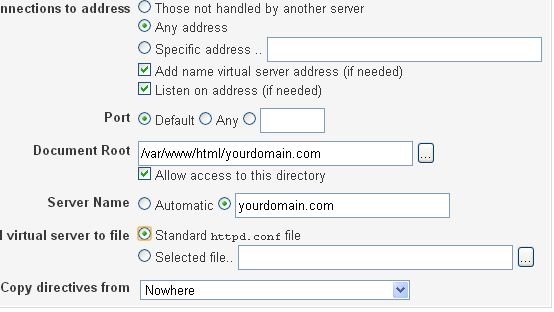
7. Click on ‘Create Virtual Host’ tab and start filling in details.
8. In ‘Document Root’, enter exactly same path to your website folder as you created in above. Alternatively, you can browse to your folder.
9. In ‘Server Name’ select the next radio button to put your server name. What it will be? The name of the Master Zone Record you created earlier in BIND (Refer very first link in this article to understand). Most of the time it will be your domain name without ‘http’ or ‘www’.
10. Leave all other options as it is unless you have more than one IP addresses on your server.
11. Hit Create and then Apply Changes from top-corner options. There shall be no errors.

Now, let’s make things little interesting.
Click on Global Configuration and then select option Edit Configuration File.
Now, scroll down to bottom of the file. You will something like this;
<VirtualHost *>
DocumentRoot /var/www/html/yourdomain.com
ServerName yourdomain.com
<Directory "/var/www/html/yourdomain.com">
allow from all
Options +Indexes
</Directory>
</VirtualHost>
You can add ServerAlias to it so the ‘www.yourdomain.com’ also redirects to your site and you don’t lose your readers. Add this line in between</Directory> and </VirtualHost>;
ServerAlias yourdomain.com www.yourdomain.com
Just remember to change yourdomain with your actual domain name. Restart the Apache by stopping and starting it.
Now if you DNS propagation is complete, then you must see Apache welcome page after accessing your domain from a browser. If its not then give it sometime. Propagation and IP binding may take up to 48 hours.
Comments for problem discussions are open 🙂